Bookbinding

Purpose and Vision 
- to be able to bind all my notebooks and other materials I may need
- the resulting bound articles need to be usable and look presentable
Next Steps 
- something for clamping/pressing
- figure out a better way to cut the text block’s edges
Notes 
It was common practice for the bookseller to offer the loose pages of a book in a package which the buyer would subsequently arrange to have bound in accordance with his or her taste and financial means.
Dr. Lorenza Smith, Aldo Manuzio (Aldus Manutius): inventor of the modern book
On Grain Direction 
- wet paper expands across the grain
- prefer folds parallel to the grain direction
- you can get away with cross grain folds for the signatures if the paper weight is low
- endpaper needs to follow this rule or it needs to be thick to be less susceptible to expansion
- endpapers get a lot of glue
- prefer thicker paper over wrong grain direction for end papers
- 120 paper with a wrong grain direction ends up in a nice mess
Binding an A5 Notebook 
Materials 
- some number of sheets of A4 paper
- each sheet gets folded creating 4 pages
- 10 signatures of 5 sheets each
- 20 pages per signature, 200 pages in total
- 70–90
- natural white over pure white
- endpaper
- 100–160
- higher if wrong grain direction
- 100–160
- cover material
- buckram with paper backing
- 2mm cardboard
- other materials
- glue, PVA
- needle and threadI use nylon thread which has low friction so it doesn’t tangle. Also knots won’t hold too well which is both good and bad. However, they’re glued after sewing anyway.
- an awl
- mull or loosely woven fabric, for reinforcing the text block’s spine and attaching it to the covers
- non-elastic gauze bandage works well
- a ruler or two
- a box cutter, and perhaps a scalpel
Making the Text Block 
- fold the sheets into signatures
- punch an even number of holes along the fold
- something like:
|_•____•__•____•__•____•_|- this does not have to be symmetrical, it may even help if it’s obvious which is the head and which is the tail end
- using a template speeds this up and ensures all holes line up
- fold a piece of paper and punch an even number of holes along the fold
- place the paper inside the folded signature and use its holes as a guide
- something like:
Mark down which way the template was used to afterwards sew the signatures together the same way. This doesn’t matter if you have a simple way to cut the head and tail straight after gluing the text block. Otherwise it eliminates an unnecessary step. Sewing aligns the holes in signatures. If they’re not offset the same distance from the edge, certain signatures start to stick out resulting in a jagged head and tail.
- press the signatures before sewing

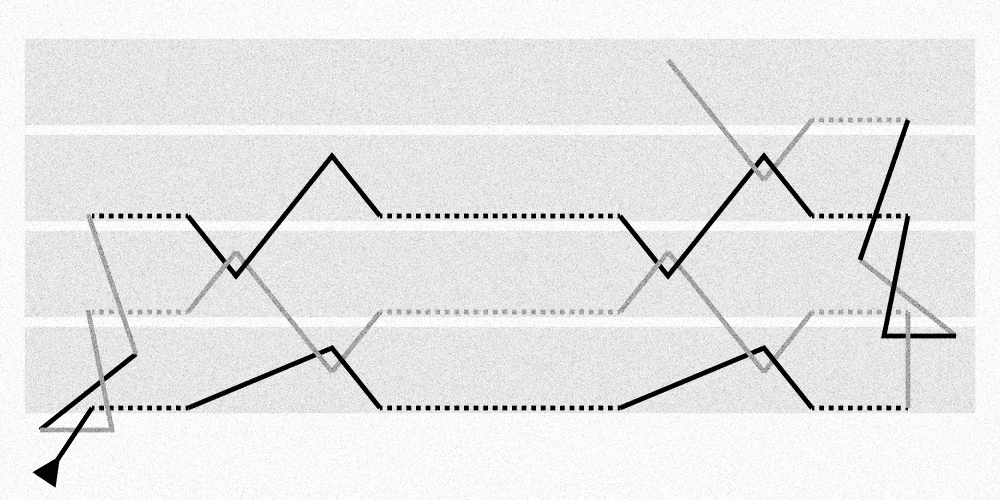
- sew the signatures together
- start from outside in with the first hole
- from the 2nd signature on, loop the thread underneath the thread of the previous signature before threading back inside the signature, to join them together—this is a french link
- tighten the signature once it’s been sewn to the previous ones, before a kettle stitch and moving onto the next one
- don’t over tighten or you’ll risk tearing the paper or creating a bow in the spine—the open edges start to fan out as if the book is always somewhat open
- when the text block is done, jog the block to the top and to the spine for alignment
- clamp down the text block leaving the spine exposed for gluing and glue the mull to the spine
- leave the overhangs free since the endpapers need to be placed between them and the first and the last page
- when the glue has dried, fold some endpapers, glue about half a centimeter wide band near the fold and attach it to the first page
- leave the ends of the mull free for now
- repeat it for the other endpaper
- once everything has dried, cut any edges that need it
- without any special equipment (like a guillotine), this may end up being an arduous process
- head and tail can most likely be left alone, unless they are unpleasantly jagged
- fore-edge definitely needs some cutting since every nested sheet in a signature extends beyond every sheet around it. From the top it looks like:
/\/\/\/\/\.
Making the Cover 
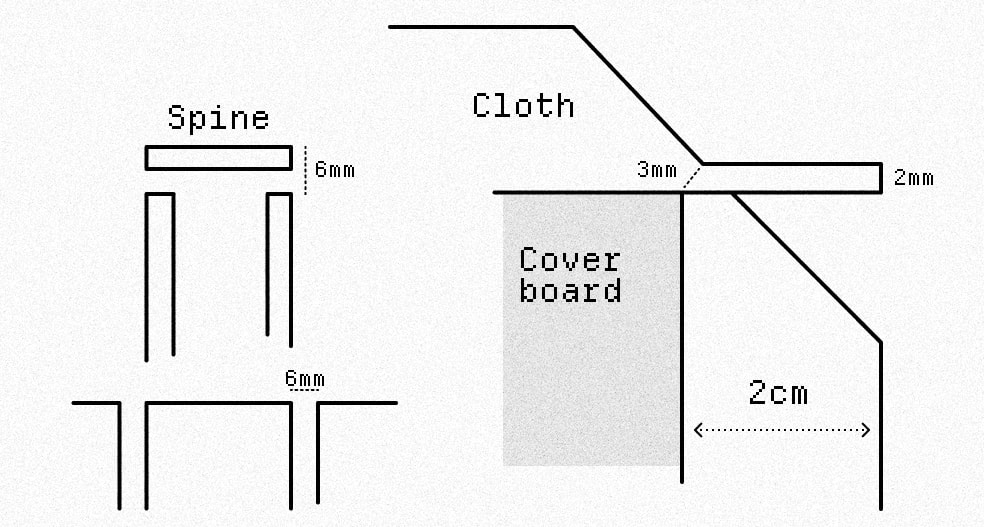
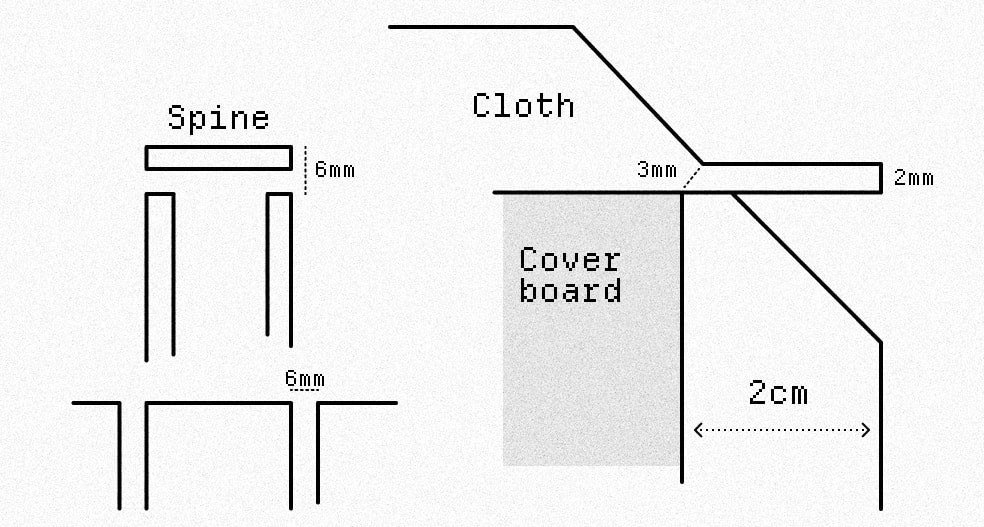
- measure the height of the text block and add about 6mm
- this is the height of the cover boards
- the 6mm creates a 3mm overhang on the head and tail ends
- the overhang on the fore-edge will be created by the hinge gap between the spine and the cover boards
- the text block will extend beyond the edges of the front and back covers towards the spine board when be book is closed (by about the length of the hinge gap minus the thickness of the spine board)
- the cover boards will be as wide as the text block
- cut the cover boards out of the cardboard
- (height of the text block + 6mm) by width of the text block
- measure the thickness of the text block along with the thickness of one of the cover boards for the spine board’s width
- if the spine is too wide the book won’t open fully, however, the width of the hinge gaps counters this
- cut the spine board out of the cardboard
- same height as the covers
- measure and cut the cover material
- leave about 20mm on every side to fold over
- and 12mm total for the two 6mm gaps on either side of the spine board for hinge gaps
- for gluing the boards to the cover material, cut a 6mm cardboard spacer to get a consistent distance between the spine and the cover boards
- find the center of the cover cloth and mark it with a line
- apply glue to the spine board and center it on the marked line
- place a spacer on one side of the spine board and glue one of the cover boards on the other side of it
- repeat with the other cover board
- cut the corners of the cover cloth at 45° 1.5 times the board thickness away from the board or 3mm from the corner of the cover board if the board is 2mm thick
- I like to do these flaps to wrap around and fully cover the corners
- glue the head and tail cloth with the flaps before folding and gluing the fore-edge over them
- press and leave to dry

Casing In 
- once the cover has dried, test the fit with the text block
- At this stage the cover may be warped due to the cover cloth and the glue pulling it that way. Gluing the endpapers inside the covers makes them pull the covers back straight
- the text block should be snugly against the spine board, it feels awkward to hold when the spine moves about
- before gluing the case to the end papers, painters’ tape the case’s fore-edges as an alignment guide
- the fore-edge of the endpapers would align with these
- cover one of the end papers with glue, glue the overhang from the mull over the endpaper, align the endpaper with the tape, and glue to the case
- then do the same with the other side
- press the book and leave to dry
Glossary 
- fore-edge - the front edge of the book, opposite to the spine
- head - the top edge of the book
- hinge gap - a gap on both sides of the spine board, between it and the front and the back cover boards
- mull - gauze in bookbinding, fixes the signatures together into a text block and joins the text block to the cover
- signature - a number of folded nested papers, a.k.a. a gathering or a section, in which case a section is of blank pages and a signature of already printed pages
- tail - the bottom edge of the book
Material Desires 
- a curved needle
- non-slip 50cm ruler
- a larger flat brush for gluing, about 2cm
- thin ribbon in at least two colors—black and red/blue for bookmarks
- black endpapers
- black cover cloth
Ævum Linea 
- 28E11 - bound the first notebook
Further Reading 
- Bookbinding: A Comprehensive Guide to Folding, Sewing & Binding (2018) - Franziska Morlok, Miriam Waszelewski
Elsewhere: ideas-for-art, The Lighthouse of Tastes and Æsthetics, Notebook